Growing up, the only fried chicken we made at home was mayai waru kaudu or tarelu kukdu. The chicken simmered first with ginger, garlic, and a few whole spices, then was dipped in beaten egg and deep-fried. Later, there were Nairobi eateries the smoky little spots where Chicken Poussin and the KFC copycats turned crispy chicken into a must-have lunch habit in the city. When KFC fever hit, secret recipes appeared everywhere, full of promises of spice blends and a coating that shattered. Although nothing had prepared me for Nashville hot fried chicken.
Every city in the US has its comfort food. New Orleans has po’boys and gumbo, Buffalo has wings, Philadelphia has cheesesteak, and Nashville, known as the Music City and home to the Grand Ole Opry and country legends like Johnny Cash and Dolly Parton, gave us this blisteringly beautiful bird.
Legend has it that Nashville hot chicken began as an act of revenge, a scorned lover, armed with far too much cayenne, set out to punish her partner with a fiery breakfast. Instead, he loved it so much that he turned it into a family recipe and, eventually, a restaurant. The rest is hot, messy history. Whether that story is myth or memory hardly matters. One bite of Nashville hot chicken and you understand that pleasure and pain have always been close companions.

I have been on a quest to perfect this recipe for a long, long time, the kind of pursuit that turns into an obsession. I did not stop at a single version; this is a tried and tested version, the result of countless rounds of brining, dredging, and frying until everything felt right from the crunch, the color, to the heat. I soaked chicken in buttermilk for tenderness and tang. I tried a straight water brine with salt, sugar, and garlic powder. I even saved pickle brine in jars, the liquid gold left behind when the spears were gone, so I would be ready to brine whenever the occasion demanded. I tested coatings too, part cornstarch for that delicate crunch, part flour for structure, and a little tempura flour for that perfect crackle. I ran the double dredge, flour to buttermilk to flour, until the crust felt right and sounded right under a knife.
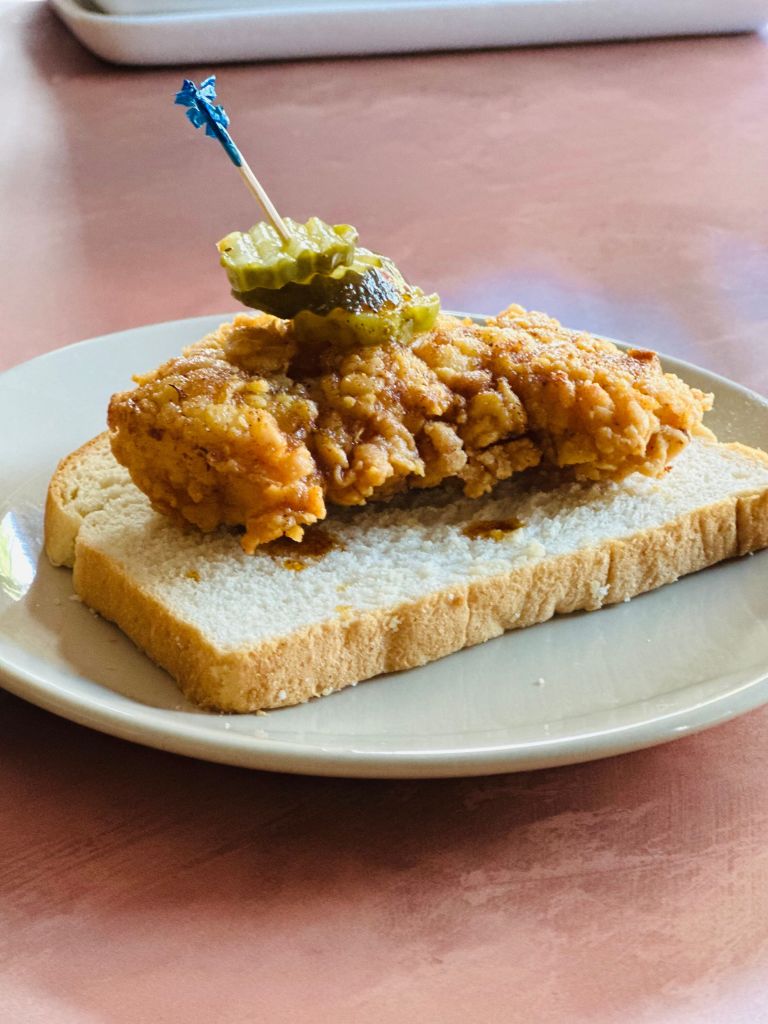
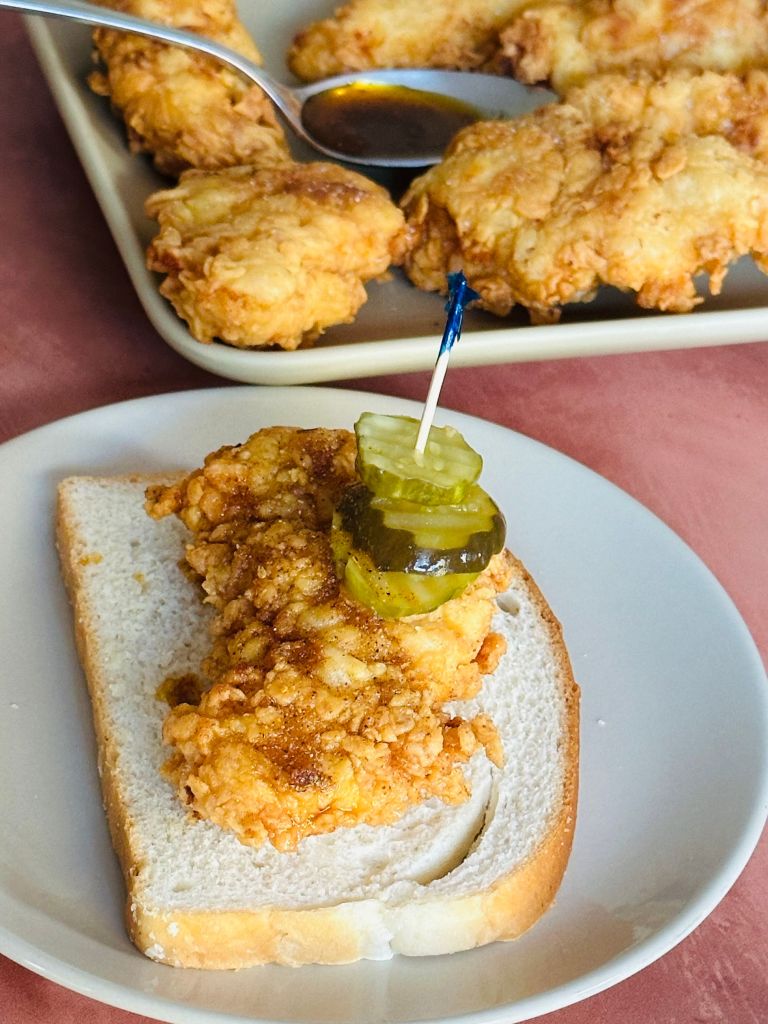
I cooked bone-in, skin-on thighs and breasts for clean slices. In the end, chicken tenderloins were my favorite cut. They take on the brine quickly, stay juicy, and are the perfect size for the kids. Two pieces tucked side by side make an easy sandwich or a tidy slider, the kind that disappears before you can count them.
Watch me make it here:
Here are four things you should focus on when making these:
Brine: The heart of this recipe begins in a bowl of water and hot sauce-Frank’s RedHot specifically, sugar, granulated garlic, and salt come together in a brine that is more Southern charm than punishment. The chicken soaks overnight, absorbing flavor. You might be tempted to shorten the marination time. Don’t. Those hours in the fridge are crucial to getting that tender chicken.
Fry: If you’ve ever stood over a pot of shimmering oil, you know this is not the time for distraction. Flour, buttermilk, and a second dusting of flour create a crust that’s equal parts crisp and cling. Keep your oil at a steady 325°F and don’t overcrowd the pan, then wait while each piece turns the color of late summer amber. Nashville hot chicken needs focus (if you see a darker shade on my table, that is because some at home like the crust burnt)
When the pieces emerge, they will be audibly crisp. Sprinkle them lightly with salt and give yourself a moment to admire your efforts, the sound, the scent, the triumph of not giving in to takeout tonight.
Heat: This is where Nashville earns its reputation. A mixture of cayenne, paprika, garlic, and sugar is blended with a ladle of the hot fryer oil, a move that feels borderline reckless, but I assure you, it is entirely worth it. The oil sizzles as it hits the spices, releasing a smoky fragrance. Brush this generously over the chicken.
Serve: There is a reason every Nashville plate comes with plain white bread and pickle slices. The bread is there to mop up the fiery drippings, and temper the heat between bites. The pickles, tart, and briny balance out the spice.
Under all that fire lies a flavor that lingers long after the burn fades, when the scent of fried spice still hangs in the air and your fingers are left deliciously stained.

Ingredients
Chicken and Marinade
- 1 whole chicken (about 4¼ pounds), cut into 10 pieces (breasts halved) or 2½ to 3 pounds (1.1–1.4 kg) chicken tenderloins
- ¾ – 1 cup cayenne hot pepper sauce (such as Frank’s RedHot)
- 2 tablespoons plus 2 teaspoons white sugar (divided)
- 2¾ teaspoons granulated garlic (divided)
- 3 tablespoons kosher salt
- Freshly ground black pepper
- 5 cups water
For Frying
- 6 cups vegetable or avocado oil
- 3 cups all-purpose flour
- 2 cups buttermilk
Spice Oil
- 2 tablespoons cayenne pepper
- 2 teaspoons paprika
- ¾ teaspoon granulated garlic
- ½ teaspoon ground black pepper
- 2 teaspoons white sugar (remaining)
To Serve
- White sandwich bread
- Pickle slices
Method
- Marinate the Chicken: Place a gallon-size resealable plastic bag inside a large bowl. Add the chicken pieces to the bag.
- In a separate bowl, whisk together the hot sauce, 2 tablespoons sugar, 2 teaspoons granulated garlic, 3 tablespoons salt, and 5 cups water until the salt dissolves. Pour the mixture over the chicken, seal the bag, and refrigerate for 5 to 8 hours.
- Prepare to fry: Fit a wire rack into a foil-lined rimmed baking sheet.
- Heat the oil in a deep fryer (or heavy cast-iron skillet) to 325 degrees Fahrenheit.
- Place the flour in one large dish and the buttermilk in another bowl.
- Drain the chicken, letting the excess marinade drip off.
- Working in batches of four to five pieces, dredge the chicken in flour, then dip in buttermilk, and dredge again in flour. Shake off any excess flour.
- Fry the chicken: Carefully lower three to four coated pieces into the hot oil.
- Fry until deep golden brown and fully cooked (165°F), about 6 to 12 minutes, depending on size.
- Transfer cooked chicken to the wire rack and sprinkle lightly with salt.
- Adjust the heat as needed to keep the oil between 300°F and 325 °F.
- Repeat with the remaining chicken.
- Make the Hot Spice Paste: In a heatproof bowl, mix cayenne pepper, paprika, remaining sugar, granulated garlic, and black pepper.
- Ladle in about one-third cup of the hot oil from the fryer and stir to form a thick paste.
- Finish and Serve: Brush the fried chicken generously with the hot spice paste.
- Serve immediately with white bread and pickle slices.
Notes from my kitchen:
Chicken cut: 2½ to 3 pounds (1.1–1.4 kg) chicken tenderloins equals to: approximately 16 to 20 tenderloins (depending on size; most are 2–3 ounces each). Marinate and coat them exactly as in the recipe, the timing just shortens a bit since tenders cook faster (about 5–7 minutes per batch at 325°F).
Customize the Heat The soul of Nashville Hot Chicken lies in it’s cayenne glaze a fiery paste of ground cayenne, paprika, sugar, garlic powder, black pepper and a ladle of hot frying oil brushed generously over the crisp chicken.
Mild: Skip the hot oil glaze altogether and enjoy perfectly seasoned fried chicken with just a whisper of spice.
Medium: Brush lightly with the glaze for a gentle burn — enough to keep things interesting without calling the fire department.
Hot: Go all in. Brush generously on both sides for that full Nashville experience — the kind that leaves your lips tingling and your heart happy.
Use a thermometer: Always check that the chicken reaches an internal temperature of 165°F(74°C) for juicy, fully cooked meat.
Control the oil temperature: Keep frying oil steady between 300°F and 325°F. Too hot and the crust burns before the meat cooks; too cool and the coating absorbs oil.
Test before you fry: Drop a pinch of flour or a small bit of batter into the oil. If it bubbles steadily, the temperature is right. If it darkens too quickly, reduce the heat slightly.
Fry in batches: Do not overcrowd the pan. Give each piece room to crisp evenly and maintain the oil temperature for consistent color and crunch. I use a cast-iron pan, but use what you have that can maintain a steady temperature.
Double dredge for texture: Coat in flour, then buttermilk, then flour again. This layering creates that signature shattering crust.
Drain: Place fried chicken on a wire rack set over a baking sheet- not on paper towels, so excess oil drips away and the coating stays crisp.
DIY Buttermilk: No buttermilk on hand? Combine 3 tablespoons vinegar or lemon juice with enough milk to make 3 cups. Stir and let sit for 5–10 minutes until slightly curdled.
Apply the hot oil glaze while hot: Brush or drizzle the cayenne oil over the chicken while both the glaze and chicken are still hot, this helps the spice soak in and cling beautifully.
Adjust the heat: Reduce or increase the cayenne pepper in the spice paste to match your family’s spice comfort level.
For the kids: Glaze only half the batch or serve the hot oil on the side for dipping. The little ones can enjoy their own version while the grown-ups turn up the heat.
Make-Ahead & Reheating
Storage: Store cooled fried chicken in an airtight container in the refrigerator for up to 3 days.
To Make Ahead: You can marinate the chicken up to 24- 48 hours in advance in the fridge. This deepens the flavor and keeps the meat juicy. Coat and fry just before serving for the best texture.
To Reheat in the Air Fryer: The air fryer is your best friend for reviving leftover fried chicken. Preheat it to 350°F(175°C), place the chicken in a single layer (do not overcrowd), and heat for 4–6 minutes or until the crust is hot and crisp again. Avoid microwaving, as it softens the coating.
To Reheat in the Oven: Alternatively, reheat on a wire rack set over a baking sheet at 375°F(190°C) for about 10–12 minutes, flipping once halfway through.
The next time the kids ask for takeout, surprise them with this instead. Crispy, fiery, and better than takeout, it is the kind of dinner that disappears faster than you can plate it. When you do, tell me how it went and how quickly the sliders vanished.


Leave a comment