The stories of biryani are as varied as the taste and flavor of the dish across the country. Whether it’s a handi full of Hyderabadi biryani, or a sufuria full in Tanzania, as soon as the lid has been lifted and the perfumed, rich and spicy steam escapes, it brings smiles on withered cheeks, stimulates conversations and unites generations. No daawat or celebrations is complete without it, the love of its scented rice and irresistible aroma passed down from generation to generation.
The name biryani comes from the Persian word biryan, which means “fried before cooking,” referring to the initial step of lightly frying the masala-marinated meat before layering it with parboiled rice and spices. This method I have here is what I learnt later in life is what the world calls a Pakki (cooked) biryani, which means the meat was marinated in yoghurt and spices, then cooked and added to the masala base before being layered with parboiled rice and steamed. There are also several types of Biryanis: Sindhi, memoni, Hyderabadi, Bombay and Karachi biryani.
My Mum used to layer the rice and chicken or mutton gravy in a handi, seal the lid with a strip of wheat dough, before cooking it in the oven or using the “dum” method (cooking slowly over a very low flame) to allow the dum or steam to tenderize the meat further, in its own juices while flavoring the rice and until the meat falls of the bone.
My MaaIL, as pre-made masalas became available used to add 2 tablespoons or so of Shan Sindhi Masala mix much later on in her cooking as a variation of the traditional East African biryani. Once the meat was cooked she would “smoke/dhungar/fukihza” it, and then serve it over a layer of rice mixed with cilantro and fried onions. Her biryani made it to the family owned restaurant, where made in small quantities, it was almost always sold out on Sundays.
I use either method to cook my biryani and usually use less sauce in the layering, so that the biryani is not soggy and wet, and serve the extra sauce on the side.
Contrary to what others say, Biryani isn’t something you can throw together in a flash, there is a detailed process to get the perfect biryani, where each grain of rice is flavorful, fluffy, and show-stopping every time. There is a method to this madness we call biryani. As a bonus, I have included an Instant Pot method as well at the end.
Watch this short clip to see how it come together:
Meat marinade:
- 1 whole chicken, skinless and cut into 12 pieces or 2-3 lb. beef/lamb/goat, cut into 1-inch cubes
- 1/2 cup plain yogurt
- 1/2 small onion, finely diced
- 1/2 tomato, chopped
- 1 teaspoons crushed green hot chilies
- 3 teaspoons ginger paste
- 2 teaspoons garlic paste
- 1 cinnamon stick
- 5 whole black peppercorns
- 2 whole cardamom pods
- 4 whole cloves
- 1 tablespoon crushed cumin (lightly roasted at first)
- 1.5 teaspoons salt
- a few drops of yellow food coloring (optional)
Fried/ Caramelized onions and potatoes:
- 3 large red onions peeled and finely sliced with a mandolin (about 2 cups- 2 ½ cup deep fried until golden and crisp- you will use some for the gravy, some for the rice and some for the garnish)
- 5 medium red potatoes, peeled and quartered (or cut into large chunks)
- 1 to 1.5 cups neutral oil, for frying
Biryani Masala:
- 3 green cardamom pods
- 5 whole cloves
- 1 cinnamon stick
- 5 whole black peppercorns
- 2 tablespoons garlic paste
- 1 tablespoon ginger paste
- 1 tablespoon green chili paste or 2 whole Thai chilies slit
- 1 tin of crushed tomatoes or 3 cups fresh tomatoes- blended
- 1 tablespoon tomato paste/puree
- 1-2 tablespoons salt
- 1 teaspoon hot red chili powder or paprika
- 1/2 teaspoon Garam Masala
- 1 tablespoons lemon juice
- 3 tablespoons olive oil (or use leftover oil from the fried onion/potatoes)
- * 1 teaspoon saffron soak in 1 tablespoon of water (optional)
* Sindhi Biryani Seasoning Mix (optional My MaaIL used to add 2 tablespoons of Shan Sindhi Masala mix to her tomato base, much later in her cooking as a variation of the traditional East African biryani. Once the meat was cooked, she would “smoke/dhungar/fukihza” it and then layer it with the rice.)
Biryani Rice:
- 3 cups -Basmati rice (Kohinoor or Royal), rinsed under cold, running water to remove as much starch as possible and soaked for 10 minutes
- 2 whole cloves (optional)
- 1-2 cinnamon stick (optional)
- 1 pod of cardamom (optional)
- 1 tablespoon olive oil
- 3 teaspoons salt
For layering:
- 1 cup chopped fresh cilantro
- ½ cup browned onions
Topping and Garnish:
- 1/3 cup Cilantro, finely chopped
- 1 Lemon cut into wedges
- ¼ cup fried onions.
Prepping the meat:
- In a large bowl, marinate the meat with yogurt, onion, tomato and all the dry spices and the ginger-garlic chili pastes, and a few drops of food coloring.
- Cover with a lid and refrigerate overnight (recommended), or at least for 1 hour.
- Cook on stovetop/ *Instant Pot/Pressure cooker until meat is cooked.
Fried /Caramelized Onions & Fried Potatoes:
- In a large skillet, heat oil over medium heat.
- Shallow fry onions for 15 – 20 minutes until they are a golden caramel brown color and are crispy they should not be raw or limp but crisp and crunchy.
- Remove from oil just before they turn a dark brown as they will continue cooking as they rest, and set aside.
- In the same oil, shallow fry the potatoes and set aside.
Biryani Masala/Gravy:
- In a large wide pan, heat the oil (or use leftover oil from the onion/potato fry)
- And add cinnamon, cardamom, cloves, peppercorns, once they sizzle and pop.
- Add the garlic fry for 5 seconds and add the ginger, tomatoes, tomato paste, salt and chili powder (and Shan Sindhi Masala if using) then cook the tomato mixture for about 10 minutes, stirring often, until the mixture thickens, oil separates.
- Add the cooked meat and any remaining liquid and about ¾ cup of the fried onions, crushing them slightly and about ½ to 1 cup of water (and saffron if using).
- Bring to a simmer and cook for 5 minutes, then add the fried potato.
- Once the mixture cooks down and thickens, spoon out any whole spices and adjust seasoning as needed.
- Add the chopped cilantro, Garam Masala and lemon juice.
Parboil Rice:
- In a large pan, bring water to a boil, add the rinsed rice and a teaspoon of salt per cup of rice and 1 tablespoon of oil and bring to a boil, cook for 6 minutes, or until 80% cooked.
- Drain and spread the rice onto a baking sheet to cool.
Note: at this point you can set aside ½ cup of rice and add a bit of orange food coloring mix gently and set it aside, this is the way I was taught (however, I now prefer to pour in the color after the layering it)
My Maail used to mix a handful of chopped cilantro and fried onions into the rice before layering it in a pot. She would then shape the rice into a ring, placing the meat in the center before leaving it to steam, on the other hand my Mum used to layer plain rice and layer the onions and cilantro on it before adding the meat creating distinct layers before sealing the pot for steaming.
Biriyani Assembly:
There are 2 ways to serve this: the East African Way or the Indian way.
No° 1
To serve the way you may see it at the mosque or a dinner invite in East Africa:
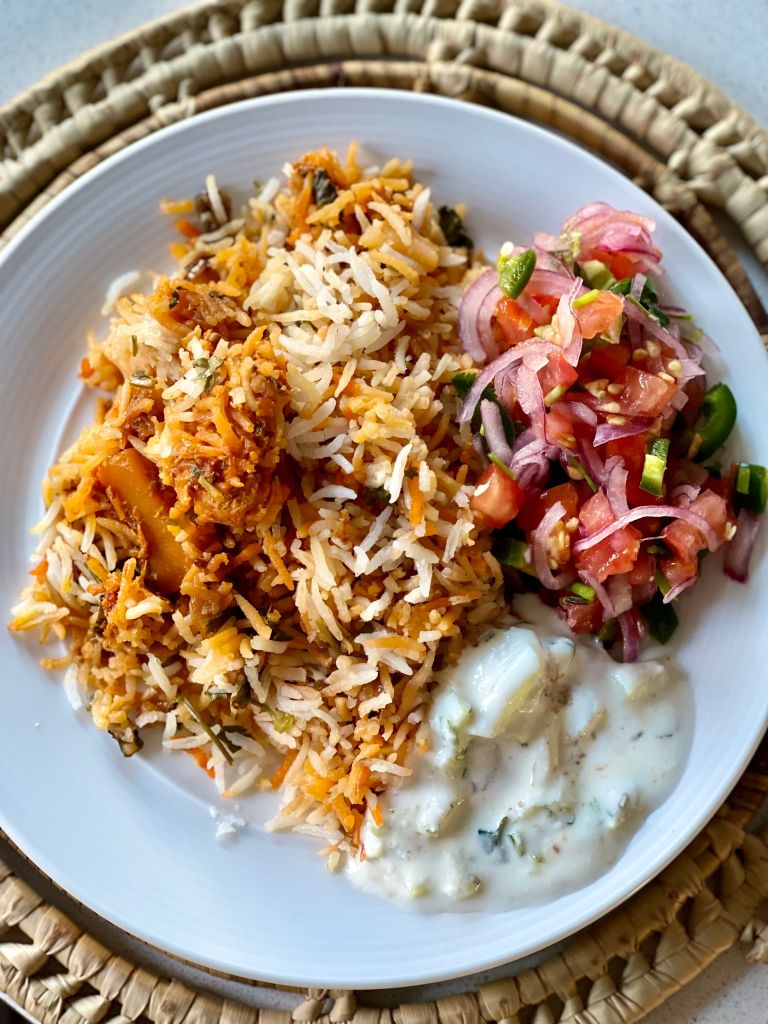
- Spread the rice on to a large serving platter, and layer the chicken biryani mixture over the top of the rice.
- Garnish with chopped cilantro, some reserved fried onions and lemon wedges.
- Serve with the classic kachumbari and a cucumber raita.
*If serving this way, fully cook the rice then gently separate the grains of rice with a fork.
No° 2
To serve the way you may see it the Indian way:
- In a Dutch oven or heavy bottomed pan scoop in some meat gravy, it is to ensure that the rice does not burn, then begin assembling the biryani.
- Start by adding half of the cooked rice to the pot, add the meat and potatoes mixture using a slotted spoon or a skimmer, you want every little gravy
- Add some fried onions and chopped cilantro over the meat
* don’t add all the gravy at this point or the biryani will get wet and soggy. - Add the remaining rice on the top and spread it to cover the meat underneath.
- Take ¼ tsp of orange color and mix it with a tablespoon of water, then pour it over the rice using a circular motion.
- Cover the pot tightly with aluminum foil and then with the lid, and place into the heated oven to cook for 15-20 minutes OR finish cooking it by placing a tava/cast iron pan on the stove, place your covered biryani pan on top and cook on low-medium heat for 30 mins.
- The rice will finish cooking and take on some of the flavor from the chicken and spices, potatoes will soften, and flavors meld together.
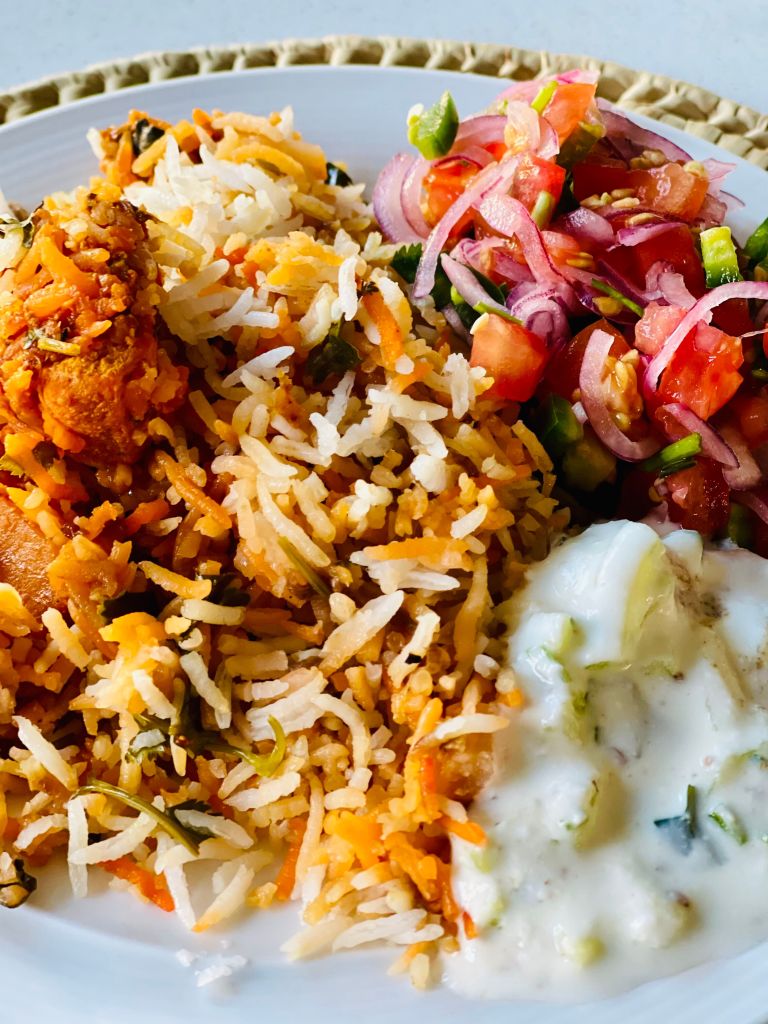
Serve the Biryani with the reserved Masala/gravy, classic kachumbari and a cooling cucumber raita.

Biryani Masala in the Instant Pot
- Turn on the SAUTÉ mode on the Instant Pot. Heat the oil (or use leftover oil from frying onions or potatoes). Add cinnamon, cardamom, cloves, and peppercorns. Let them sizzle and pop.
- Add garlic and sauté for 5 seconds, then add ginger, tomatoes, tomato paste, salt, chili powder, and Shan Sindhi Biryani Masala (if using). Cook for about 6 minutes, stirring often, until the mixture thickens and the oil separates.
- Add the marinated meat along with any remaining marinade liquid. Pour in ½ to 1 cup of water (and saffron, if using).
- Close the Instant Pot lid.
- Press CANCEL, then select MANUAL(Pressure Cook) mode.
- Set the timer for 5 minutes on HIGH pressure (this is for chicken- red meats will take longer).
- Once done, manually release the pressure immediately.
- Add the fried potatoes, ¾ cup of fried onions(slightly crushed).
- Remove any whole spices and adjust seasoning as needed.
- add the chopped cilantro, Garam Masala and lemon juice.
Layering the Biryani In the Instant Pot:
- First meat layer – Remove half of the cooked meat and set it aside in a bowl. This will form the middle layer of your biryani.
- Over the meat left in the Instant Pot, spread half of the parboiled rice evenly. Sprinkle some fried onions and chopped cilantro over the rice.
- Second Meat Layer – Add the reserved meat, spreading it evenly.
- Final Rice Layer – Top with the remaining parboiled rice.
- Mix ¼ teaspoon of orange food color with 3 tablespoons of water. Drizzle it over the top layer of rice in a circular motion for that signature biryani look.
Your Instant Pot Biryani is now ready for Dum (steaming)!
To steam (dum) the biryani in an Instant Pot after layering the cooked meat and rice, follow these steps:
Method 1: Using the”Keep Warm” Mode (Gentle Dum)
- Layer the Biryani – Assemble the cooked meat and cooked rice in layers, finishing with rice on top. Drizzle color or saffron-infused water, cilantro and fried onions if using.
- Seal the Lid – Close the Instant Pot lid and ensure the vent is set to“Sealing.”
- Select“Keep Warm” Mode – This maintains gentle heat and allows the flavors to meld without overcooking.
- Leave it for 30–40 minutes – The residual heat will steam the biryani without burning.
Method 2: Using the“Pressure Cook” Mode(Faster Dum)
- Add ¼ cup warm water – Pour it along the sides of the pot to create steam without making the rice mushy.
- Layer and Seal – As above, layer the biryani and close the lid.
- Select“Pressure Cook” on Low for 5 minutes – This creates gentle dum without overcooking.
- Quick Release after 10 minutes – Let it naturally release pressure for 10 minutes before manually venting.
Getting That Signature Biryani Look and Flavor:
Notes:
- If doubling this recipe, make 2-3 layers of the rice and chicken so that it is well blended and not soggy.
- Homemade crispy fried onions bring out the best flavor and aroma to a biryani, it’s an extra step but so worth it, I avoid the store bought ones as they are usually stale and have a coating of wheat flour.
- Give the rice color: For that unique vibrant biryani color, mix a pinch of powdered food coloring with warm water and drizzle it over the rice before layering. If you prefer a more natural approach, soak a few strands of saffron in warm milk or water—this not only gives a gorgeous golden hue but also adds a rich, aromatic depth to the dish.
- For flavorful chicken or meat, score bone in chicken legs with a sharp knife before rubbing marinating. This helps the spices seep deep into the meat.
- Ideally, let it marinate for 6–24 hours for the best results, but if you’re in a hurry, even 30 minutes if you’re short on time.
- A great biryani starts with good aged rice. I always rinse my aged, long-grain Kohinoor or Royal Basmati Rice under cold water until it runs clear—this removes excess starch and keeps the grains from sticking together. After rinsing, soaking the rice for 20–30 minutes helps achieve that perfect, fluffy texture. When it’s time to cook, I parboil it for just 6 minutes to get it ready for layering.
- Making biryani in an Instant Pot is a shortcut, but it’s not exactly traditional. The high pressure can turn the rice mushy (and nobody wants that).
- To keep the grains separate and perfectly cooked, I always prepare the rice separately and then layer it with the rest of the dish.
- Alternate Meats and Cuts: Boneless or bone in chicken, and cubed lamb, goat, or beef (red meats require a longer cook time and you will have to adjust your water accordingly)
Serving Suggestions
- Dice or slice 2 onions, 3 green Thai hot chilies/Jalapeños, 2 tomatoes on the vine, and a handful of fresh cilantro
- Add them into a bowl and mix. Add the juice of half a lemon and 1 teaspoon salt and red chili powder.
Did you make this? I would love to see it- Tag me @Spicymemsahib on Instagram.


Leave a comment